Installing a solar-powered attic fan is a smart move, especially in hot climates like Arizona or Texas. These fans reduce attic temperatures, lower cooling costs, and require no electrical wiring. Here’s a breakdown of what to expect:
☀️ Solar-Powered Attic Fan Installation Overview
✅ What It Is
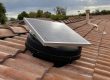
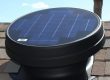
A solar-powered attic fan uses solar panels to power a ventilation fan that removes hot air from your attic. Most units are roof-mounted and self-contained.
💰 Cost to Install in 2025
| Item | Price Range |
|---|---|
| Fan Unit | $300 – $600 |
| Installation Labor | $250 – $500 |
| Total Installed Cost | $550 – $1,100 |
🔧 Add ~$100–$250 if you need roof modifications or electrical backup wiring.
⚙️ Installation Process
-
Site Evaluation – Choose a sunny part of the roof.
-
Roof Cutout – Install the fan over a hole cut in the attic.
-
Flashing & Sealing – Fan is secured and sealed to prevent leaks.
-
Solar Panel Positioning – Some are built-in, others tilt or mount separately.
-
Optional Thermostat/Humidistat – For automatic operation control.
🕒 Time Required: 2 to 4 hours for a standard installation.
🔋 Benefits
-
Reduces attic heat by 30–50°F
-
Cuts HVAC load and extends roof life
-
No electricity bills or wiring
-
Often eligible for a 26% federal tax credit (ITC)
🚫 Common Mistakes to Avoid
-
Installing in shaded roof areas
-
Poor flashing/sealing (can lead to leaks)
-
Undersizing for attic square footage
-
Not checking local building codes or HOA restrictions
🏠 Best Brands in 2025
-
QuietCool – Whisper-quiet, efficient, U.S.-made
-
Natural Light – Popular with good warranties
-
Remington Solar – Hybrid solar/electric option with thermostat
-
iLiving – Budget-friendly and effective
Your roof type significantly affects the kind of solar-powered attic fan you’ll need and how it gets installed. Here’s how it breaks down based on the most common roof types:
🏠 Common Roof Types and Solar Fan Considerations
1. Asphalt Shingle Roof (Most Common)
-
✅ Ideal for: Most solar attic fan models
-
🔧 Installation: Easy; standard flashing kits work well
-
💡 Tip: Ensure the fan is installed under the top layer of shingles with proper sealant to avoid leaks.
2. Tile Roof (Clay or Concrete)
-
⚠️ Challenges: Fragile tiles can crack during install
-
🛠️ Solution: Use a tile roof flashing kit and hire a roofer with tile experience
-
💡 Tip: Mount on a flat tile section and use foam/sealant to fill voids underneath
3. Metal Roof (Standing Seam or Corrugated)
-
✅ Ideal with specialized mounting brackets
-
🛠️ Tip: Use butyl tape or rubber gaskets under brackets to ensure watertight seal
-
🚫 Avoid: Screwing into seams or ridges—use seam clamps if possible
4. Flat Roof
-
⚙️ Solution: Use a curb-mounted fan or frame it to tilt toward the sun
-
💡 Tip: May require custom flashing or reinforced waterproofing membrane
5. Wood Shake Roof
-
⚠️ Risk: High fire risk—many solar fans are not rated for use on shake roofs
-
🛠️ Alternative: Install under an overhang or inside a gable instead
-
🔥 Tip: Consider switching to a more fire-safe material if you’re upgrading
📏 Fan Sizing by Attic Square Footage
Attic Size Fan Capacity Needed Up to 1,600 sq. ft. 20–30 watt fan 1,600–2,800 sq. ft. 30–40 watt fan 2,800+ sq. ft. 40–60+ watt fan or multiple fans -
Solar Attic Fan Installation In The East Valley AZ
Elite Home Daylighting Systems offers tubular skylights and solar attic fan installation services to the entire Phoenix east valley. Service area includes Chandler, Gilbert, Mesa, Tempe & more! Contact us for a free quote today!
More Articles About Solar Power
- Tubular Skylights Pros And Cons
- Solar Attic Fans Pros And Cons
- 6 Easy Ways To Lower Your Electric Bill In Arizona
- How Much Do Solar Tubes Cost?
- Skylights Vs Solar Tubes: Costs, Pros And Cons